HowTo #1 : Manipulation of Windows log files (EN)
Hello everyone, here we are, the first article in a series where I will present you small tips to save time everyday on cybersecurity subjects. Today, we will see how to easily manipulate Windows logs with Powershell.
If you have already used the event viewer on Windows, you may have noticed several limitations. First, event viewer can be very slow when you try opening big files with a lot of events. Second, you cannot properly do advanced filtering such as regex.
So, that’s why I have decided to try out Powershell, which includes cmdlet specially for Windows logs file. Furthermore, one of the positive points of using Powershell is automation and scripting.

2. HowTo
First, let’s see how can we read one ore more evtx files in Powershell:
PS C:\Users\toto> Get-WinEvent -Path "C:\Users\toto\evtx\my_evtx_file.evtx"
PS C:\Users\toto> Get-WinEvent -Path "C:\Users\toto\evtx_files\*.evtx"
Of course, Get-WinEvent supports multiple formats such as :
- evt
- evtx
- etl
Now, it is display time! The following example shows the default display format when you use Get-WinEvent :
PS C:\Users\toto> Get-WinEvent -Path "C:\Users\toto\evtx_files\*.evtx"

   ProviderName: Microsoft-Windows-Security-Auditing

TimeCreated                     Id LevelDisplayName Message
-----------                     -- ---------------- -------
01/01/1970 10:10:10           4624 Information
Because Powershell is so powerful and flexible, you have lots of possibilities concerning filtering. For instance, here is how you can filter on one specific category :
PS C:\Users\toto> Get-WinEvent Security

   ProviderName: Microsoft-Windows-Security-Auditing

TimeCreated                     Id LevelDisplayName Message
-----------                     -- ---------------- -------
01/01/1970 10:10:10           4624 Information

PS C:\Users\toto> Get-WinEvent Application

   ProviderName: Windows Error Reporting

TimeCreated                     Id LevelDisplayName Message
-----------                     -- ---------------- -------
01/01/1970 10:10:10           1001 Information      Détecteur d'erreurs 0, type 4…
I’ve briefly showed you the default display but if you test it, you will observe long descriptions and messages which are not very easy to read. However, we’re lucky, as there is a solution to adjust width automatically :
PS C:\Users\toto> Get-WinEvent Security | Format-Table -Property * -AutoSize -WrapFor more information about formatting in Powershell, you can check the following link : https://learn.microsoft.com/en-us/powershell/scripting/samples/using-format-commands-to-change-output-view?view=powershell-7.3
If you do not like the Powershell display or if you are not a terminal enthusiast, you can still export data. For example, you can transform your data in a CSV file with the Export-CSV function which is explained with more details here: https://learn.microsoft.com/en-us/powershell/module/microsoft.powershell.utility/export-csv?view=powershell-7.3
Regarding filtering, there are two possibilities :
- -FilterXPath
- -FilterHashtable
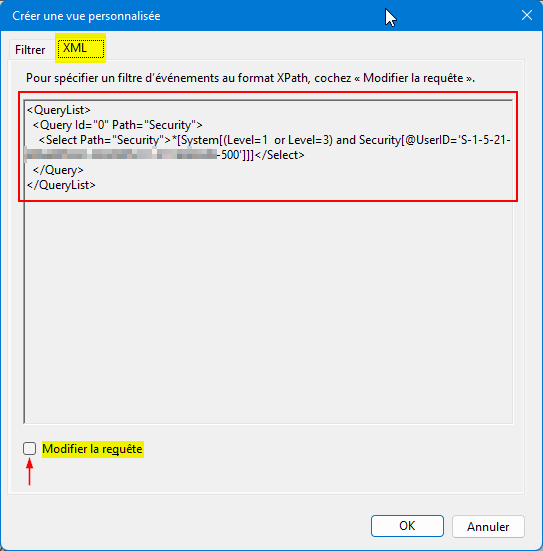
The first one is the same as filtering on the event viewer.
To apply the filter in Powershell, you have to get the string between the Select tags and put it in the command like that :
PS C:\Users\toto> Get-WinEvent Security -FilterXPath "*[System[(EventID=4104)]]"For the second possibility of filtering, here is how can we do :
PS C:\Users\toto> Get-WinEvent -FilterHashtable @{ LogName='Application'; Id='1001' } -MaxEvent 1 | Format-Table -Property * -AutoSize -Wrap

Message
-------
Détecteur d'erreurs 0, type 4
Nom d’événement : APPCRASH
Réponse : Non disponible
ID de CAB : 0

[...]
In the example above, you can notice the -MaxEvent option which limits the number of events. It is very useful when you work on a huge set of logs and your filter is not finished yet. You can also order results using temporality with the -Oldest option.
Finally, if you want to filter on a specific string or character, you can do it like this:
PS C:\Users\toto> Get-WinEvent Security | select @{Label='Messages';Expression={$_.properties.Value}} | Where-Object {$_.Messages -like "*docx*"}3. Conclusion
Here are the basics, it is of course possible to do so much more with the Get-WinEvent cmdlet. In addition, you are also aware that Powershell embeds dozens and dozens of functions which allow filtering, display options or export. With all of these basic explanations, you can now deal with investigation faster and even automate them.
4. Bibliography
- Format in Get-WinEvent : https://learn.microsoft.com/en-us/powershell/scripting/samples/using-format-commands-to-change-output-view?view=powershell-7.3
- Use of Export-CSV : https://learn.microsoft.com/en-us/powershell/module/microsoft.powershell.utility/export-csv?view=powershell-7.3
Thank you for reading this article, I really hope it’s been useful! Do not hesitate commenting via the forms just below.